Skip to content

How to Clean a Basement in Denver, CO: 8 Foolproof Steps for a Fresh Start

Why Learning How to Clean a Basement Matters
Basements have a way of becoming the catch-all space for everything that doesn’t quite fit anywhere else. Holiday decorations, camping gear, old furniture, boxes of keepsakes, and maybe a few spider webs all compete for space.
Unfortunately, Denver’s climate doesn’t make basement maintenance any easier. Snowmelt, occasional heavy rains, dry air, and fine dust can all contribute to dirty, musty, or cluttered basements if they’re left unchecked.
Learning how to clean a basement properly can help you remove built-up dust, reduce moisture problems, prevent musty odors, and create a cleaner, healthier space. The good news is that it doesn’t have to feel overwhelming. With the right approach, you can tackle the job one step at a time and transform your basement into an area that’s easier to use and maintain.
This guide explains how to clean a basement step by step, along with Denver-specific tips to help you deal with dust, snowmelt, moisture, and other challenges common in Colorado homes.
Table of Contents
- What You’ll Need Before You Start
- Step 1: Inspect the Basement Before Cleaning
- Step 2: Remove Clutter Before Deep Cleaning
- Step 3: Dust and Vacuum From the Top Down
- Step 4: Clean Walls, Shelving, and Storage Areas
- Step 5: Clean Basement Floors Based on the Flooring Material
- Step 6: Remove Mold, Mildew, and Musty Odors
- Step 7: Organize Your Basement for Easier Maintenance
- Step 8: Prevent Future Basement Problems
- Denver Basement Cleaning Tips
- Common Basement Cleaning Mistakes to Avoid
- How Often Should You Clean a Basement?
What You’ll Need Before You Start
Having the right equipment makes basement cleaning significantly easier, especially in Denver homes where fine dust and seasonal moisture are common.
Gather these supplies before you begin:
- HEPA-filter vacuum
- Microfiber dust cloths
- Mop and bucket
- Mild all-purpose cleaner
- Neutral floor cleaner
- Dehumidifier
- Protective gloves
- Dust mask or respirator if heavy dust is present
- Trash bags
- Waterproof storage bins
- Mold cleaner for visible mold on appropriate surfaces
- Radon test kit (recommended for Colorado homes)
Why a HEPA Vacuum Makes a Difference
Many homeowners assume any vacuum will do, but basement dust is often much finer than ordinary household dust. A HEPA filter captures at least 99.97% of particles measuring 0.3 microns under standardized testing, helping trap fine dust instead of blowing it back into the air. This is especially helpful in Denver, where the dry climate allows dust to accumulate quickly.
Our Denver cleaning team also recommends using microfiber cloths instead of dry dusters. Their split synthetic fibers trap dust and allergens instead of simply moving them around, reducing the amount that settles back onto cleaned surfaces.
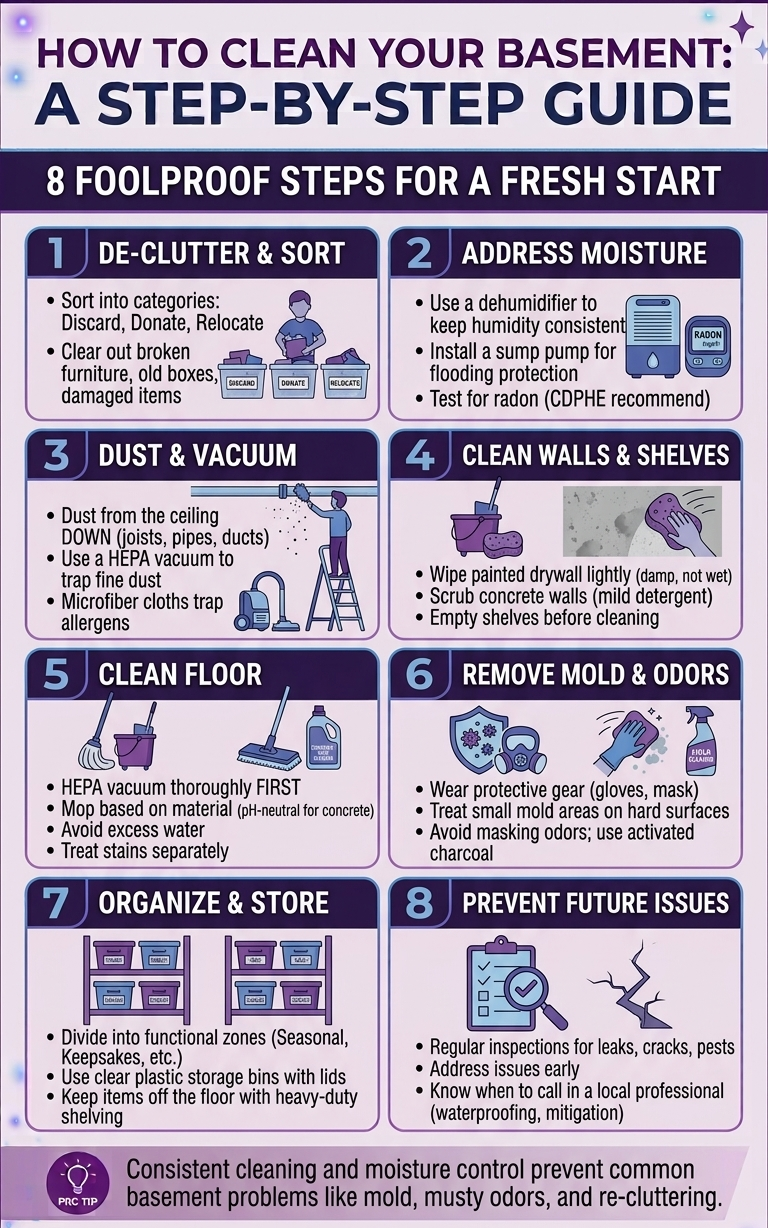
Step 1: Inspect the Basement Before Cleaning
Cleaning any basement is a challenge. However, cleaning a basement in Denver is a very specific challenge. Before you break out the vacuum and the hazmat suit, it helps to understand what you’re actually up against.
Cleaning first and inspecting later often means you miss early warning signs that could turn into expensive repairs.
Look for:
- Water stains
- Foundation cracks
- Condensation around pipes
- Signs of pests
- Musty odors
- Mold or mildew
- Rust on shelving or appliances
Why Denver Basements Need Extra Attention
Denver’s semi-arid climate is a recipe for dust, dryness, and random pockets of moisture. Snowmelt in spring, torrential rain in late summer, and wildly fluctuating humidity all make basements especially vulnerable to moisture buildup, mold, and mildew, according to the Environmental Protection Agency.
Add in Colorado’s unique geological makeup, and you’ve also got radon to worry about.
According to the Colorado Department of Public Health and Environment, nearly half of all homes here have radon levels above safe thresholds. That’s not a scare tactic; it’s just what happens when your city was built on uranium-rich soil.
Step 2: Remove Clutter Before Deep Cleaning
Before you start vacuuming or wiping down surfaces, clear as much clutter from the basement as possible.
Cleaning around stacked boxes, old furniture, or seasonal equipment often means you’ll miss hidden dust, moisture problems, and pest activity. A clear workspace also makes it easier to clean thoroughly without having to move the same items multiple times.
As you remove belongings, inspect them for signs of water damage, mold, mildew, or pest infestations.
Sort Items Into Three Categories
Rather than making dozens of small decisions, use a simple sorting system to keep the process moving.
Discard
Throw away broken furniture, damaged cardboard boxes, expired paint or cleaning products (following your local hazardous waste disposal guidelines), water-damaged paper items, and anything beyond repair.
Removing these items immediately prevents them from being moved repeatedly throughout the cleaning process.
Donate
If an item is still clean and functional but no longer serves your household, set it aside for donation. Clothing, furniture, sporting goods, household décor, and small appliances are often accepted by local Denver organizations such as Habitat for Humanity ReStore, Arc Thrift Stores, and The Action Center.
Relocate
Many basements become storage spaces for items that belong elsewhere in the home. Return misplaced tools, holiday decorations, paperwork, children’s toys, or seasonal supplies to their proper locations before you begin deep cleaning. This reduces clutter and makes organizing the basement much easier once cleaning is complete.
Why Decluttering Comes First
Decluttering isn’t just about creating more floor space. It also helps uncover areas that often go months or even years without being inspected.
Moving shelving, boxes, and stored furniture may reveal foundation cracks, moisture stains, insect activity, rodent droppings, or mold growth that would otherwise remain hidden. Addressing these issues early allows you to solve the underlying problem before investing time in deep cleaning.
One thing our Denver cleaning team notices during basement cleanings is that homeowners often vacuum around stored items instead of moving them. Once the boxes come off the floor, it’s common to find thick dust buildup, cobwebs, moisture stains, or forgotten spills underneath. Clearing the room first allows you to clean every surface thoroughly while giving you a chance to spot small maintenance issues before they become costly repairs.
Step 3: Dust and Vacuum From the Top Down
One of the biggest mistakes homeowners make is vacuuming the floor first. Dust doesn’t stay where it starts.
As you clean shelves, exposed pipes, ceiling joists, ductwork, and light fixtures, dust falls downward. Cleaning from the highest surfaces first prevents you from vacuuming the same area twice.
Work in this order:
- Ceiling joists and exposed beams
- Pipes and ductwork
- Light fixtures
- Vents
- Shelving
- Storage bins
- Window ledges
- Baseboards
- Floors
Fine dust particles remain suspended in the air for several minutes before settling. Cleaning overhead surfaces first allows airborne dust to fall naturally before your final vacuuming pass. This reduces recontamination and makes the entire process more efficient.
In many homes we clean, exposed basement ceilings collect a surprising amount of dust because Colorado’s dry climate allows airborne particles to circulate more easily throughout the year.
Step 4: Clean Walls, Shelving, and Storage Areas
Once you’ve finished dusting and vacuuming, it’s time to clean the surfaces that collect everyday grime. Basement walls, shelves, and storage areas often accumulate more than visible dust. They can also collect grease, pollen, pet dander, and fine particles that settle over time, especially in unfinished basements or spaces with limited airflow.
Different materials require different cleaning methods, so using the right approach helps remove dirt without causing unnecessary damage.
Painted Drywall
Painted drywall only needs light cleaning in most cases. Wipe the surface with a microfiber cloth to remove loose dust, then use a lightly damp cloth with a mild all-purpose cleaner to remove fingerprints or light stains.
Avoid oversaturating the wall, as excess moisture can soften drywall and damage the paint finish.
Concrete Walls
Concrete is naturally porous, meaning it can absorb moisture, dirt, and odors over time.
For routine cleaning, scrub the surface with a soft-bristle brush, warm water, and a mild detergent to remove surface grime. If you notice white, powdery residue (known as efflorescence), it may be a sign that moisture is moving through the concrete and should be investigated before it leads to bigger problems.
Shelving and Storage Bins
Empty shelves before cleaning so you can reach corners and hidden dust buildup. Plastic storage bins can be wiped down with an all-purpose cleaner before being returned to the shelves. For metal shelving, dry the surface thoroughly after cleaning to help reduce the chance of rust forming in damp conditions.
Storage areas often go months, or even years, without being cleaned. During that time, dust, lint, pollen, insect debris, and other airborne particles settle on shelves and containers.
Removing these contaminants not only improves the overall cleanliness of your basement but also helps reduce the amount of dust that gets stirred back into the air every time you move or reorganize stored items.
Step 5: Clean Basement Floors Based on the Flooring Material
Once you’ve cleaned the walls, shelves, and storage areas, finish with the floor. Since dust and debris naturally settle downward during cleaning, leaving the floor until the end prevents you from cleaning the same area twice.
The best cleaning method depends on the type of flooring in your basement. Using the right products not only improves cleaning results but also helps protect the material from unnecessary wear.
Concrete Floors
Concrete basement floors are durable, but they’re also porous. That means they can absorb moisture, dirt, and spills if they’re left untreated.
- Vacuum thoroughly with a HEPA-filter vacuum to remove loose dirt, fine dust, and debris before using any liquid cleaner.
- Mop the floor with warm water and a pH-neutral or mild detergent designed for concrete to lift surface dirt without damaging the material.
- Avoid using excessive water during mopping, as standing moisture can seep into cracks or joints and contribute to future moisture problems.
- Treat stubborn stains separately. For small grease stains, apply a concrete-safe degreaser or a paste made from baking soda and water, then gently scrub the area with a nylon brush before rinsing.
For small grease stains, a concrete-safe degreaser or a paste made from baking soda and water can help loosen residue before scrubbing gently with a nylon brush.
Finished Flooring
Finished basements often include vinyl plank, laminate, tile, or sealed hardwood flooring. Each material has different cleaning requirements.
- Vinyl plank flooring can usually be cleaned with a damp microfiber mop and a manufacturer-approved cleaner.
- Ceramic or porcelain tile should be vacuumed first, then mopped with a pH-neutral cleaner to remove dirt while protecting the grout.
- Laminate flooring should only be lightly damp-mopped, since excess moisture can cause swelling along the seams.
- Sealed hardwood floors should be cleaned with products specifically designed for wood flooring and should never be saturated with water.
Following the manufacturer’s care recommendations helps preserve the floor’s finish and extend its lifespan.
Step 6: Remove Mold, Mildew, and Musty Odors
Basements naturally have less airflow than the rest of the home, making them more likely to develop musty odors or moisture-related problems. Addressing these issues early helps improve indoor air quality and prevents small problems from becoming larger ones.
For small areas of visible mold on hard, nonporous surfaces, wear gloves, eye protection, and an appropriate mask before cleaning.
Depending on the surface and the product label, you may use:
- An EPA-registered mold and mildew remover
- A mild detergent solution for routine cleaning
- White vinegar on certain hard, nonporous surfaces where appropriate
Always follow the product label and ensure good ventilation while cleaning.
Porous materials such as mold-contaminated carpet, insulation, ceiling tiles, or cardboard boxes often cannot be effectively cleaned and may need to be discarded if mold growth is extensive.
Eliminate Musty Odors
A musty smell usually indicates excess moisture rather than dirt alone.
To help reduce odors:
- Run a dehumidifier after cleaning.
- Improve ventilation whenever weather allows.
- Remove damp cardboard boxes or fabrics.
- Dry wet areas as quickly as possible.
- Use activated charcoal or baking soda to help absorb lingering odors.
Simply masking odors with air fresheners rarely solves the underlying problem.
Step 7: Organize Your Basement for Easier Maintenance
Once the basement is clean, organizing it properly makes future cleaning faster and helps reduce clutter from building up again.
Rather than storing everything wherever there’s space, divide the basement into functional zones.
For example:
- Holiday decorations
- Camping equipment
- Sports gear
- Household tools
- Cleaning supplies
- Family keepsakes
Grouping similar items together makes them easier to find while keeping walkways clear.
Choose Better Storage Solutions
Instead of storing belongings in cardboard boxes, consider using clear plastic storage bins with tight-fitting lids.
Plastic containers help protect contents from dust and occasional moisture while allowing you to see what’s inside without opening every container.
Heavy-duty shelving also keeps boxes off the floor, making it easier to clean underneath and reducing the risk of water damage if minor moisture issues occur.
Rotate Seasonal Items
Many Denver homeowners use their basements to store outdoor equipment throughout the year.
Moving seasonal items closer to the front of storage areas when they’re needed helps reduce unnecessary clutter.
For example:
- Move skis, snow boots, and holiday decorations forward during the fall and winter.
- Rotate camping gear, bicycles, and hiking equipment into easier-to-reach locations during spring and summer.
This simple habit makes the basement easier to maintain throughout the year.
Step 8: Prevent Future Basement Problems
Once your basement is decluttered, organized, and cleaned, the real key to keeping it that way is prevention. A little routine inspection now can save you from major headaches (and repair bills) later.
Look for Early Warning Signs of Damage
Basements rarely fail overnight. Most problems start small and then quietly get worse:
- Cracks in walls or floors: Even hairline cracks can let in water over time.
- Water stains or discoloration: A brown ring on the wall usually means past seepage.
- Pooling water: Especially after heavy rain or rapid snowmelt.
- Rust on appliances or storage racks: A subtle sign of recurring dampness.
- Persistent odors: A musty smell often signals hidden mold or leaks.
Install Tools to Keep Your Basement Safe
For Denver homeowners, a few simple upgrades can provide long-term peace of mind:
- Sump pump: Protects against flooding by automatically pumping water away.
- French drain system: Redirects groundwater away from your foundation.
- Radon detector: Essential in Colorado, where radon levels are notoriously high.
- Dehumidifier with auto-drain: Keeps humidity consistent without needing constant emptying.
- Insulation upgrades: Helps regulate basement temperature and prevents condensation.
Know When to Call in a Local Cleaning Professional
Some issues are DIY-friendly, others… not so much. If you notice persistent leaks, serious mold growth, or high radon readings, it’s worth calling a professional. Denver has no shortage of specialists for waterproofing, radon mitigation, and foundation repair.
And when it comes to deep cleaning, local cleaning experts like Roochii Cleaning are here to make things life easy for you. Our Denver-based cleaning team specializes in tackling tough basement messes, from years of dust buildup to stubborn odors. We bring professional-grade equipment, eco-friendly products, and the kind of thorough clean that makes your space feel brand new.
Denver Basement Cleaning Tips
While the basic cleaning process is similar in most homes, Denver’s climate creates a few challenges that make basement maintenance a little different. From dry, dusty air to seasonal snowmelt, understanding these local conditions can help you keep your basement cleaner throughout the year.
Prepare for Snowmelt and Seasonal Moisture
Denver’s winters bring snow, and when temperatures rise, melting snow can introduce moisture around your home’s foundation. Even if your basement never floods, small amounts of moisture can increase humidity and create musty odors over time.
Each spring, inspect your basement for:
- Damp spots near exterior walls
- Water stains on concrete or drywall
- Condensation around windows or pipes
- Musty smells that linger after wet weather
Catching these issues early helps prevent larger moisture problems later in the year.
Stay Ahead of Colorado’s Fine Dust
Colorado’s dry climate means fine dust settles quickly throughout the home, especially in unfinished basements with exposed ceiling joists, ductwork, and storage shelving.
Our Denver cleaning team often recommends vacuuming exposed surfaces every month, even if the basement isn’t used frequently. Regular dust removal prevents buildup from becoming harder to remove during seasonal deep cleanings.
Don’t Overlook Radon Testing
Colorado has one of the highest rates of elevated residential radon levels in the country. While cleaning doesn’t affect radon, routine basement maintenance is a good opportunity to test your home if you haven’t done so recently.
If your radon test results exceed the recommended action level, contact a qualified radon mitigation professional before finishing or remodeling the basement.
Common Basement Cleaning Mistakes to Avoid
Even with the best intentions, a few common mistakes can make basement cleaning more difficult or reduce the effectiveness of your hard work.
1. Cleaning the Floor First
Dust always falls downward as you clean. Vacuuming or mopping before dusting shelves, ceiling joists, vents, and pipes usually means you’ll have to clean the floor all over again.
2. Leaving Cardboard Boxes on the Floor
Cardboard absorbs moisture and can weaken over time. It also provides an ideal place for dust, insects, and mildew to accumulate.
Replacing cardboard boxes with sealed plastic storage bins helps protect your belongings while making the basement easier to clean.
3. Ignoring Humidity
A basement may look clean while excess moisture is quietly creating conditions for mold or mildew growth. Running a dehumidifier during wetter months can help keep humidity at a healthier level.
4. Forgetting Hidden Areas
Dust often collects behind shelving, underneath stored furniture, around utility equipment, and along wall edges. Pulling movable storage away from the walls during deep cleaning allows you to clean these overlooked spaces and inspect them for moisture or pests.
5. Waiting Too Long Between Deep Cleanings
Small amounts of dust and clutter are easy to manage. Waiting several years between cleanings often turns a simple maintenance project into a much larger job.
How Often Should You Clean a Basement?
The right cleaning schedule depends on how you use the space, but regular maintenance is usually easier than occasional deep cleaning.
| Task | Recommended Frequency |
|---|---|
| Vacuum high-dust areas | Monthly |
| Dust shelving and storage bins | Monthly |
| Check for moisture or leaks | Monthly |
| Mop hard floors | Every 2–3 months |
| Rotate seasonal storage | Every season |
| Inspect for mold or mildew | Every season |
| Deep clean the entire basement | Every 6–12 months |
If your basement is used as a living area, home office, gym, or playroom, you may need to clean it more frequently than a storage-only space.
Final Thoughts: How to Clean a Basement the Right Way
Learning how to clean a basement is about more than improving appearances. A clean basement is easier to organize, healthier to spend time in, and less likely to develop moisture, odor, or mold problems over time. By following a consistent cleaning routine and addressing small issues before they become larger ones, you can protect both your belongings and your home.
For Denver homeowners, regular basement maintenance is especially important because of Colorado’s unique combination of fine dust, seasonal snowmelt, and changing humidity levels. Staying ahead of these conditions helps keep your basement cleaner, more comfortable, and ready for whatever you use it for, whether that’s storage, a home gym, a workshop, or additional living space.
If your basement has years of accumulated dust, persistent musty odors, or clutter that feels overwhelming, a professional deep cleaning may be worth considering. For larger projects, experienced cleaning professionals can help restore the space while allowing you to focus on organizing and maintaining it afterward.
FAQ
FAQs About How to Clean a Basement
A light cleaning every month and a deep clean at least once a year is ideal. Denver’s dust-prone climate means basements get dirty faster than you think, and seasonal snowmelt can bring extra moisture. A yearly deep clean helps you stay ahead of mold, mildew, and clutter.
For small patches, a mix of vinegar and water or a store-bought mold remover works well. Spray the affected area, scrub with a stiff brush, and let it dry completely. If mold covers a large area or keeps coming back, it’s time to call in professionals for safe and permanent removal.
Not always, but it’s highly recommended. Denver basements can be dry most of the year, but summer storms and spring snowmelt can cause sudden humidity spikes. A dehumidifier helps prevent mold and keeps the air more comfortable year-round.
Start by removing clutter and anything damp, then deep clean walls and floors. Running a dehumidifier, improving ventilation, and setting out bowls of baking soda or activated charcoal can also neutralize odors. If the smell lingers, it could signal hidden moisture or mold.
You can test for radon using a simple home testing kit, but mitigation should be left to certified professionals. In Colorado, radon is a serious concern, and professional systems ensure your basement stays safe.
For unfinished spaces, stick with the basics: a broom, mop, HEPA vacuum, stiff scrub brush, mild detergent, vinegar or mold spray, and protective gear like gloves and a mask. These tools are enough to tackle dust, dirt, and minor mold growth in most Denver basements.
Start by removing clutter so you can access every surface. Next, inspect for moisture or damage, dust from the ceiling down, vacuum thoroughly with a HEPA-filter vacuum, clean walls and shelving, wash the floors, and address any mold or musty odors before reorganizing the space.
Bleach isn't always the best choice, particularly on porous materials where it may not penetrate deeply enough to address the underlying problem. Small areas of mold on hard, nonporous surfaces can often be cleaned using products specifically labeled for mold and mildew, following the manufacturer's instructions. Larger areas or recurring mold should be evaluated by a qualified professional.